Mastering The DJI Mavic 4 Pro With These 9 Expert Tips & Tricks
- by Stefan Gandhi
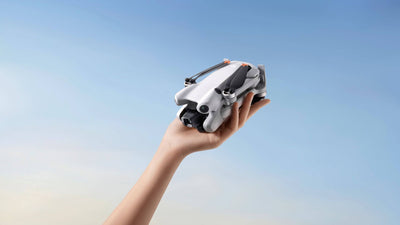
The DJI Mavic 4 Pro is one of the most capable folding drones on the market, blending cinematic image quality with advanced automation and intuitive control. Whether you're flying for creative content, commercial use or sheer thrill, this powerhouse has a toolkit that goes far beyond the basics. Below, we break down nine expert-level tips and tricks to help you maximise performance, unlock hidden features and elevate your aerial shooting experience.
Tip 1: Increase Your Max Speed for Agile Flight
Straight out of the box, the Mavic 4 Pro is a swift performer in sport mode, capped at 25 m/s. However, you can push this even further. Navigate to the control settings, then select gain and expo tuning. Under the sport mode configuration, you can increase the max horizontal speed up to 27 m/s. This marginal boost may seem minor, but in competitive or cinematic tracking shots, every extra metre per second counts.
Tip 2: Expand Gimbal Range for Vertical Shooting
Shooting in vertical mode has become essential for social media and mobile-first content. The standard gimbal range in portrait mode offers a tilt from -10° to 10°, but enabling 'tilt angle expansion in portrait' in the control settings will extend this from -22° to 12°.
Want even more flexibility? Switch the camera to 4K 9:16 mode. This allows a full gimbal range from -90° to 70°, ideal for creative vertical pans and dynamic angle work. While this mode doesn't use the entire sensor, it’s perfectly suited for platforms like Instagram and TikTok.
Tip 3: Swipe to Navigate Compass and Vision Assist
The compass and vision assist features offer excellent situational awareness, but tapping the tiny button to cycle views can be fiddly mid-flight. A better option is to simply swipe on the compass area. This intuitive shortcut cycles between the full map view, the compass and vision assist, streamlining your navigation and letting you stay focused on your subject.
Tip 4: Decouple Vision Assist for Flexible Screen Placement
When vision assist is active, you’re not limited to its default screen position. By tapping and dragging upward, you can decouple it from its fixed spot and reposition it anywhere on the screen. This is especially helpful if you're juggling multiple telemetry or camera overlays and need a cleaner, more customised layout.
Tip 5: Master ActiveTrack with Manual and Auto Modes
Tracking shots are where the Mavic 4 Pro truly shines. With ActiveTrack, you can choose between auto and manual tracking. In manual mode, you have full 360° control, dragging your subject around the screen to place the drone exactly where you want it. Two proximity rings allow you to adjust the tracking distance on the fly.
Prefer a hands-off approach? Switch to automatic mode. The drone intelligently assesses the scene and chooses the most aesthetic tracking path, ideal when your focus is on action or performance rather than camera control.
Tip 6: Customise Power On and Off Options
By default, unfolding the rear right arm powers on the drone automatically. If you want more control, head to the safety settings. You can disable this feature or enable a fold-to-power-off option. You can also disable both and choose to manage power manually. This flexibility helps prevent unintentional start-ups and is ideal for professional workflows where gear transport and handling are tightly managed.
Tip 7: Preview Log Footage with Display Assist
Shooting in D-Log or D-Log M offers immense grading flexibility but can be difficult to judge in real-time due to the flat colour profile. Enabling colour display assist provides an in-camera LUT preview while recording. This function also extends to playback, allowing you to preview graded footage immediately after capture or toggle it off to review the unprocessed look. It’s a powerful feature for colour-conscious shooters wanting assurance on set.
Tip 8: Record Audio with Built-in and External Mics
The DJI RC Pro 2 includes a built-in mic that can embed audio into screen recordings and HD video, ideal for narrations or ambient sound. Ensure 'app recording' is enabled under the camera settings.
For higher-quality audio, the controller also supports the DJI Mic 2 ecosystem. You can either plug in via USB-C or connect wirelessly via Bluetooth. To pair a transmitter, go to connected devices in the settings, activate pairing mode on your Mic 2, and select it once detected. This is especially useful for documentary shoots or live commentary.
Tip 9: Use Quick Shot Camera Rotation for Dynamic Shots
One of the Mavic 4 Pro’s standout features is its rotating camera. While manually rotating mid-flight can be disorienting, DJI has introduced a specific quick shot mode that automates this movement. Simply configure your parameters, hit go and let the drone execute a smooth rotational sequence. It’s a simple way to add high-impact motion to your footage without losing control or spatial awareness.
Conclusion
The DJI Mavic 4 Pro isn’t just a drone, it’s a creative powerhouse for filmmakers, surveyors and aerial storytellers. By applying these expert tips, you can go beyond default settings and tap into the drone’s full potential. Whether you’re speeding through scenic vistas, composing vertical content or capturing studio-grade footage in the field, the Mavic 4 Pro delivers unmatched flexibility and control.
Looking to upgrade or purchase the DJI Mavic 4 Pro? Visit the Coptrz official online store here for expert advice and competitive pricing.


